30 December 2011

Building the Tank Plug #2

I locked the two halves together with some scrap wood to make sure they
didn't shift while I jointed up the "ribs" of the tank plug.

Doing a rough mockup of the plug helped me determine the correct angle
to cut the "backbone" at.

I left the ribs secured to the base when I made the cuts for the tunnel so that
everything would line up later on.

Rough cutting the tunnel.

Checking the fit.

03 December 2011

1974 Honda CB360

Here are a few pics of the latest addition to my (slowly) growing motorcycle collection.  This little beauty is a 1974 Honda CB360 that I picked up in Newark, OH.  Everything is stock with the exception of the air boxes that one of the previous owners had discarded in favor of a pair of crap uni-filters.  Thanks to the miracle of eBay I've already acquired a pair of NOS air filter units and a pair of original air box covers.  The missing hardware has been ordered from CMS in the Netherlands and should be here in a couple of weeks.

This bike was pretty well maintained, the throttle sticks a little and seat has
a couple of rips but other than that I haven't found any issues (famous last words).

There is a pretty good sized scratch in the paint/graphic on the tank but
no dents.  The previous owner had scuffed something along it somehow.

Not a bad looking bike.  I'm going to strip it down over the winter and go
over everything to check for wear and tear.  The carbs will need a thorough
cleaning at the very least, maybe even a rebuild.

All told I'm very pleased with this purchase.  I managed to get it started after an oil change, new plugs, new battery (that I pulled from the 450).  I had to remove the uni-filters to get enough air through to it.

Building the Tank Plug #1

Here are some pictures from the early stages of the gas tank mold building process.  I worked out all of the dimensions in Adobe Illustrator and printed templates to use for cutting out the various pieces that will make up the skeleton of the mold plug.  I built a mockup version using old scrap pine to see I needed to adjust any of my dimensions.  I'm building the final plug skeleton out of oak.

Here is the template for one half of the tank base.

The template has been traced and the locations of the "ribs" have been transferred.

2 pieces were screwed together and cut out as one to ensure that they are
symmetrical.  I cleaned up the curve using the sanding disc on the table saw.

I drilled all of the holes while the pieces were still together.  I used a drill press
this time around to avoid some of the accuracy issues I ran into with the mockup.

I cut our each of the ribs pairs using the same process as I did for the base.

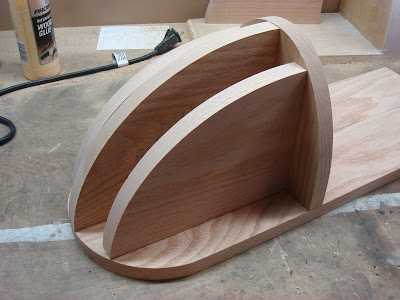
Here is basically what the rib setup will look like.

In the mackup I used the same 3/4" boards that I did for the ribs and base but
it created too much of a flat spot long the spine of the tank so for this version
I'm using 1/4" thick oak.  Unfortunately our local Home Depot only sells it in
5 1/2" wide boards so I'm just using some scrap prices to bridge them together.

Here is the spine after cutting and sanding.

Everything fits very well, the benefits of doing a mockup version first.

07 November 2011

The Bars

Here's another random pic from around Christmas time.  My lovely wife got me these clip-ons from DCC.

Now I have something to attach the NOS controls I purchased a while back.

Building the Seat Plug #2

It's depressing when I think about how little I've gotten done on the project so far. Here are a few pics of the seat plug frame that I forgot to post.

Because the positioning of the edges is so important I glued the pieces
before attempting to drill holes for the screws to keep the pieces from shifting.
The two side pieces were screwed together before the final sanding
to ensure that they were perfectly symmetrical.

11 May 2011

License Plate Bracket

The last thing anyone wants to stick on the back of their bike is an ugly old license plate but I don't think I'd make it too far down the road without one.  I used the same 1" x 1/8" flat bar that I made the rear marker light mounts out of to make a license plate bracket.  I kept it clean and simple and rounded the ends to match the marker light mounts.

Clean and simple.

Nothing clutters up the back end of a bike quite like a license plate.  I used
the old one that was left on the bike when I bought it to check the clearances.
I wire-wheeled the finish off to make it a little less annoying to look at.

08 May 2011

Building the Seat Plug #1

I'm a little short on cash for this project at the moment so I've decided to start working on the seat fabrication.  I've mentioned before that I wasn't thrilled with the seat that I purchased from BCR and I decided early on that I wanted to try my hand at building one.  Thankfully wood is cheap and I have all of the necessary tools to begin building a plug for the seat.  I'm going to use the BCR seat as rough guide for the style but I'm going to tweak some of the measurements a bit to give me a little more room under the seat hump for the wiring and electric bits.

I'm using 3/4" solid oak for the base and framing of the plug.
I had plenty of pine on hand from other projects but I wanted to go with something harder so I picked a few pieces of 10" wide oak boards at Home Depot.

I cut the tail curve using a router with a jig I made specifically for this project.
It would have been nearly impossible to get a cut this clean with a jigsaw.
After a few practice cuts on some scrap wood to get the jig set properly I
ended up with a perfect 4" radius cut.  No sanding necessary.